Close

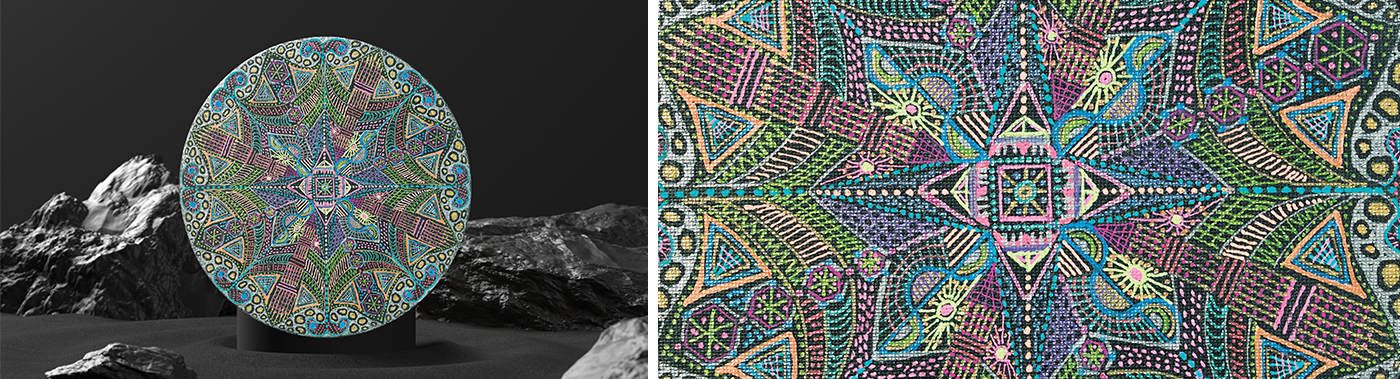
Black Canvas Mandala
Lesson Plan, Grades 6-12, Art, Math, Social Studies, Drawing
Description
Lesson Plan and Artwork by Carol Miller
Radial designs have been used in numerous cultures over time, as exhibited in European architecture, Mexican paper cutting, colonial quilts and Middle Ages jewelry, to name a few. But the Mandala from India, in this generation, has become a generic term for the art form. Here, with some inspiration from Zentagle, a circular canvas panel and pens are used to add a textural element, reminiscent of beading or possibly needlepoint, to this ancient art.
Objectives
- Students will incorporate repetitive geometric shapes, patterns or symbols, drawn freehand or with the use of templates, to create a radial, embellished design on a circular black canvas with pens.
Supplies Needed
Fredrix® Value Series Cut Edge Canvas Panels, 8" Round, Black, Pack of 2
Sakura® Gelly Roll Metallic Pen Set, Medium, .4mm, Set of 10
Sakura® Gelly Roll Metallic Pen Set, Bold, .1.0mm, Set of 1
Sakura® Gelly Roll Moonlight Pens, Fine, .6mm, Set of 10
Sakura® Gelly Roll Moonlight Pens, Bold, 1.0mm, Set of 10
Sakura® Gelly Roll Stardust Pens, Galaxy Colors, Set of 6
Sargent Art® Liquid Metal Metallic Markers, Fine Point, Assorted Colors, Set of 6
Flexible Drawing Template
Vinyl Eraser, White, 2 1/2"x3 1/4"x1"
*Here are the supplies needed for this lesson plan for reference. Find a convenient carousel of shoppable products for this lesson below.
Standards
Creating
Anchor Standard #1: Generate and conceptualize artistic ideas and work.
Anchor Standard #3: Refine and complete artistic work.
Responding
Anchor Standard #8: Interpret intent and meaning.
Connecting
Anchor Standard #11: Relate artistic ideas and works with societal, cultural and historical context to deepen understanding.
Instructions
1
Trace the circular canvas panel, onto copy paper or something comparable. Cut out carefully because this will be used as a template. (If you prefer, you may use a compass to draw comparable guidelines directly onto the canvas.)
2
Fold the paper circle in half. Open and fold in half again creating a criss-cross. Fold two more times making eight "slices of a pie", with all folds facing upward.
3
Gently flatten the folds and place the paper circle on the canvas. With a sharp pencil, carefully punch a tiny hole, where all the folds meet, making a mark on the canvas to indicate the center.
4
While holding the paper circle in place, make a mark at the ends of each fold, along the circumference of the canvas.
5
Remove the paper circle. Using a ruler, draw four lines from the circumference marks through the center of the canvas, so it looks like pie slices.
6
Make marks on each line, one inch apart. These pencil guidelines will look silvery on the canvas, but will be easily covered by the gelly roll pens.
7
Using a pencil first and starting in the center, draw a single shape over the center or draw a symbol, shape or pattern that can be repeated four or eight times around the canvas. It can be drawn freehand or with a drawing/all purpose template. If you make a mistake, gently use a vinyl eraser to remove the pencil.
8
Cover the pencil lines with the gelly roll pens and embellish as desired.
9
Continue drawing one set at a time, of four or eight shapes, symbols, patterns, etc. in pencil, then covering and embellishing with the pens.
10
Use the pencil guidelines as needed to keep the design symmetrical. Also, the canvas is textured, so you may have to apply a bit more pressure using the gelly roll pens than if drawn on paper.
11
Continue drawing set after set, using pencil, then pen, until the desired amount of the canvas is covered.
Younger Student Variation1) Step #1 is the same. You may wish to use tracing paper instead to make cutting easier and a bit more accurate. 2) Fold the paper as you would for an eightsided snowflake and cut out small shapes along the folds. Snip off a tiny center. 3) Unfold, flatten and trace onto the canvas to making guideline shapes and your center shape. Generally follow steps 7-11, as able, but use metallic markers and apply gentle pressure wherever pens (gelly roll pens) are indicated.