Close

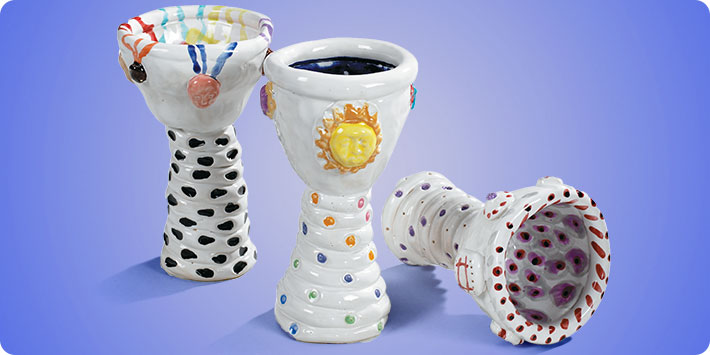
Majolica Goblets
Lesson Plan, Grades 4-12, Sax Lesson Plans, Art, Social Studies, AMACO
Description
Majolica pottery demonstrates that a beautiful idea can travel the globe! During China's Ming Dynasty (1368-1644), potters used cobalt, an Arabian mineral, to create a dark blue glaze to contrast with China's white porcelain clays. Later, Islamic potters mimicked the look with their reddish, iron-rich clays by painting bright oxides and stains on a tin-glazed, opaque white background. Their wares became as popular as Chinese Ming pottery and often were shipped from Spain to Italy via the port of Majorca, an island off Spain's eastern coast. Pottery painted with colors over a white base became known as "majolica" and was widely produced in Italy during the Renaissance. Florentines Lucca and Andrea de la Robbia were the best-known majolica clay artists, creating large religious relief sculptures glazed with bright colors on a gloss-white base. To this day, Italian potters still produce beautiful majolica - and your students can, too!
Objectives
- Students will create a food-safe majolica goblet by placing a pinch bowl atop a coiled base. Students will explore the movement of art concepts through different geographies and across cultures.
Supplies Needed
Amaco® Clay, Red Clay, 67-M 351476
Amaco® Clay, White Art 25-M 351452
Amaco® Designer Push Molds, Day of the Dead theme 1402966
Amaco® Designer Push Molds, Turtle and Frog Theme 1442856
Amaco® Designer Push Molds, Fossil Theme 1402973
Amaco® Tri-Bead Rollers 405657
Amaco® Opaque White LG-11 Glaze, 1 pint 351785
Amaco® Teacher's Palette Non-Toxic Glaze Set, 8 oz Jars, Set of 12 1367947
Student Modeling Tools 402381
Standards
CONTENT Standard #1: Understanding and applying media, techniques and processes
CONTENT Standard #3: Choosing and evaluating a range of subject matter, symbols and ideas
CONTENT Standard #4: Understanding the visual arts in relation to history and cultures
Instructions
Teacher preparation:
Gather photographs of Ming Dynasty pottery as well as Islamic and Italian pottery in the majolica style. Display in the classroom resources that explain the style's movement across cultures.
1
Start with a baseball-sized lump of clay (about 1 pound) for a small goblet and an orange-sized lump (about 1 ½ pounds) for a larger one.
2
Make a pinch pot:
3
Roll the remaining clay on the tabletop into several ropes the diameter of your little finger. Set aside the best rope for the rim, covering it with plastic.
4
Score and slip the bottom of the pinch pot. Then score and slip the ropes and coil them atop it, pressing them gently together. Make the coils close and tight near the pinch pot, where fingers will grip the goblet, and coil the ropes upward to the goblet's desired height.
5
Turn goblet right side up. Gently tap the base coil flat so the goblet is stable and the rim is parallel to the tabletop.
6
Score and slip the pinch pot rim and place the reserved rope atop it. With a wooden tool or your finger, gently smooth the joint, affixing the rope firmly and tidily to the rim.
7
Texture, stamp and sprig goblet as desired. Support goblet gently with your fingers as you texture or stamp it; score and slip any sprigs and clay pieces you add to the goblet.
8
Turn goblet upside down to dry. Check that the base is parallel to the tabletop.
9
Decorate the goblet with the majolica technique:
10
Do so slowly if you have applied glaze to bone-dry greenware.